> ## Documentation Index
> Fetch the complete documentation index at: https://docs.bronto.io/llms.txt
> Use this file to discover all available pages before exploring further.
# SSO Overview
> Configure single sign-on (SSO) so users log in to Bronto through your identity provider using SAML or OIDC, instead of a password.
## Overview
Single sign-on (SSO) lets your users log in to Bronto through your existing identity provider (IdP) instead of a Bronto password. Bronto supports both **SAML** and **OIDC** providers.
For step-by-step instructions for a specific provider, see:
* [Google SAML IdP](/Account-Management/SSO/google-saml)
* [Okta OIDC](/Account-Management/SSO/okta-oidc)
* [Microsoft Entra ID](/Account-Management/SSO/entra-id) (SAML or OIDC)
## Add an identity provider
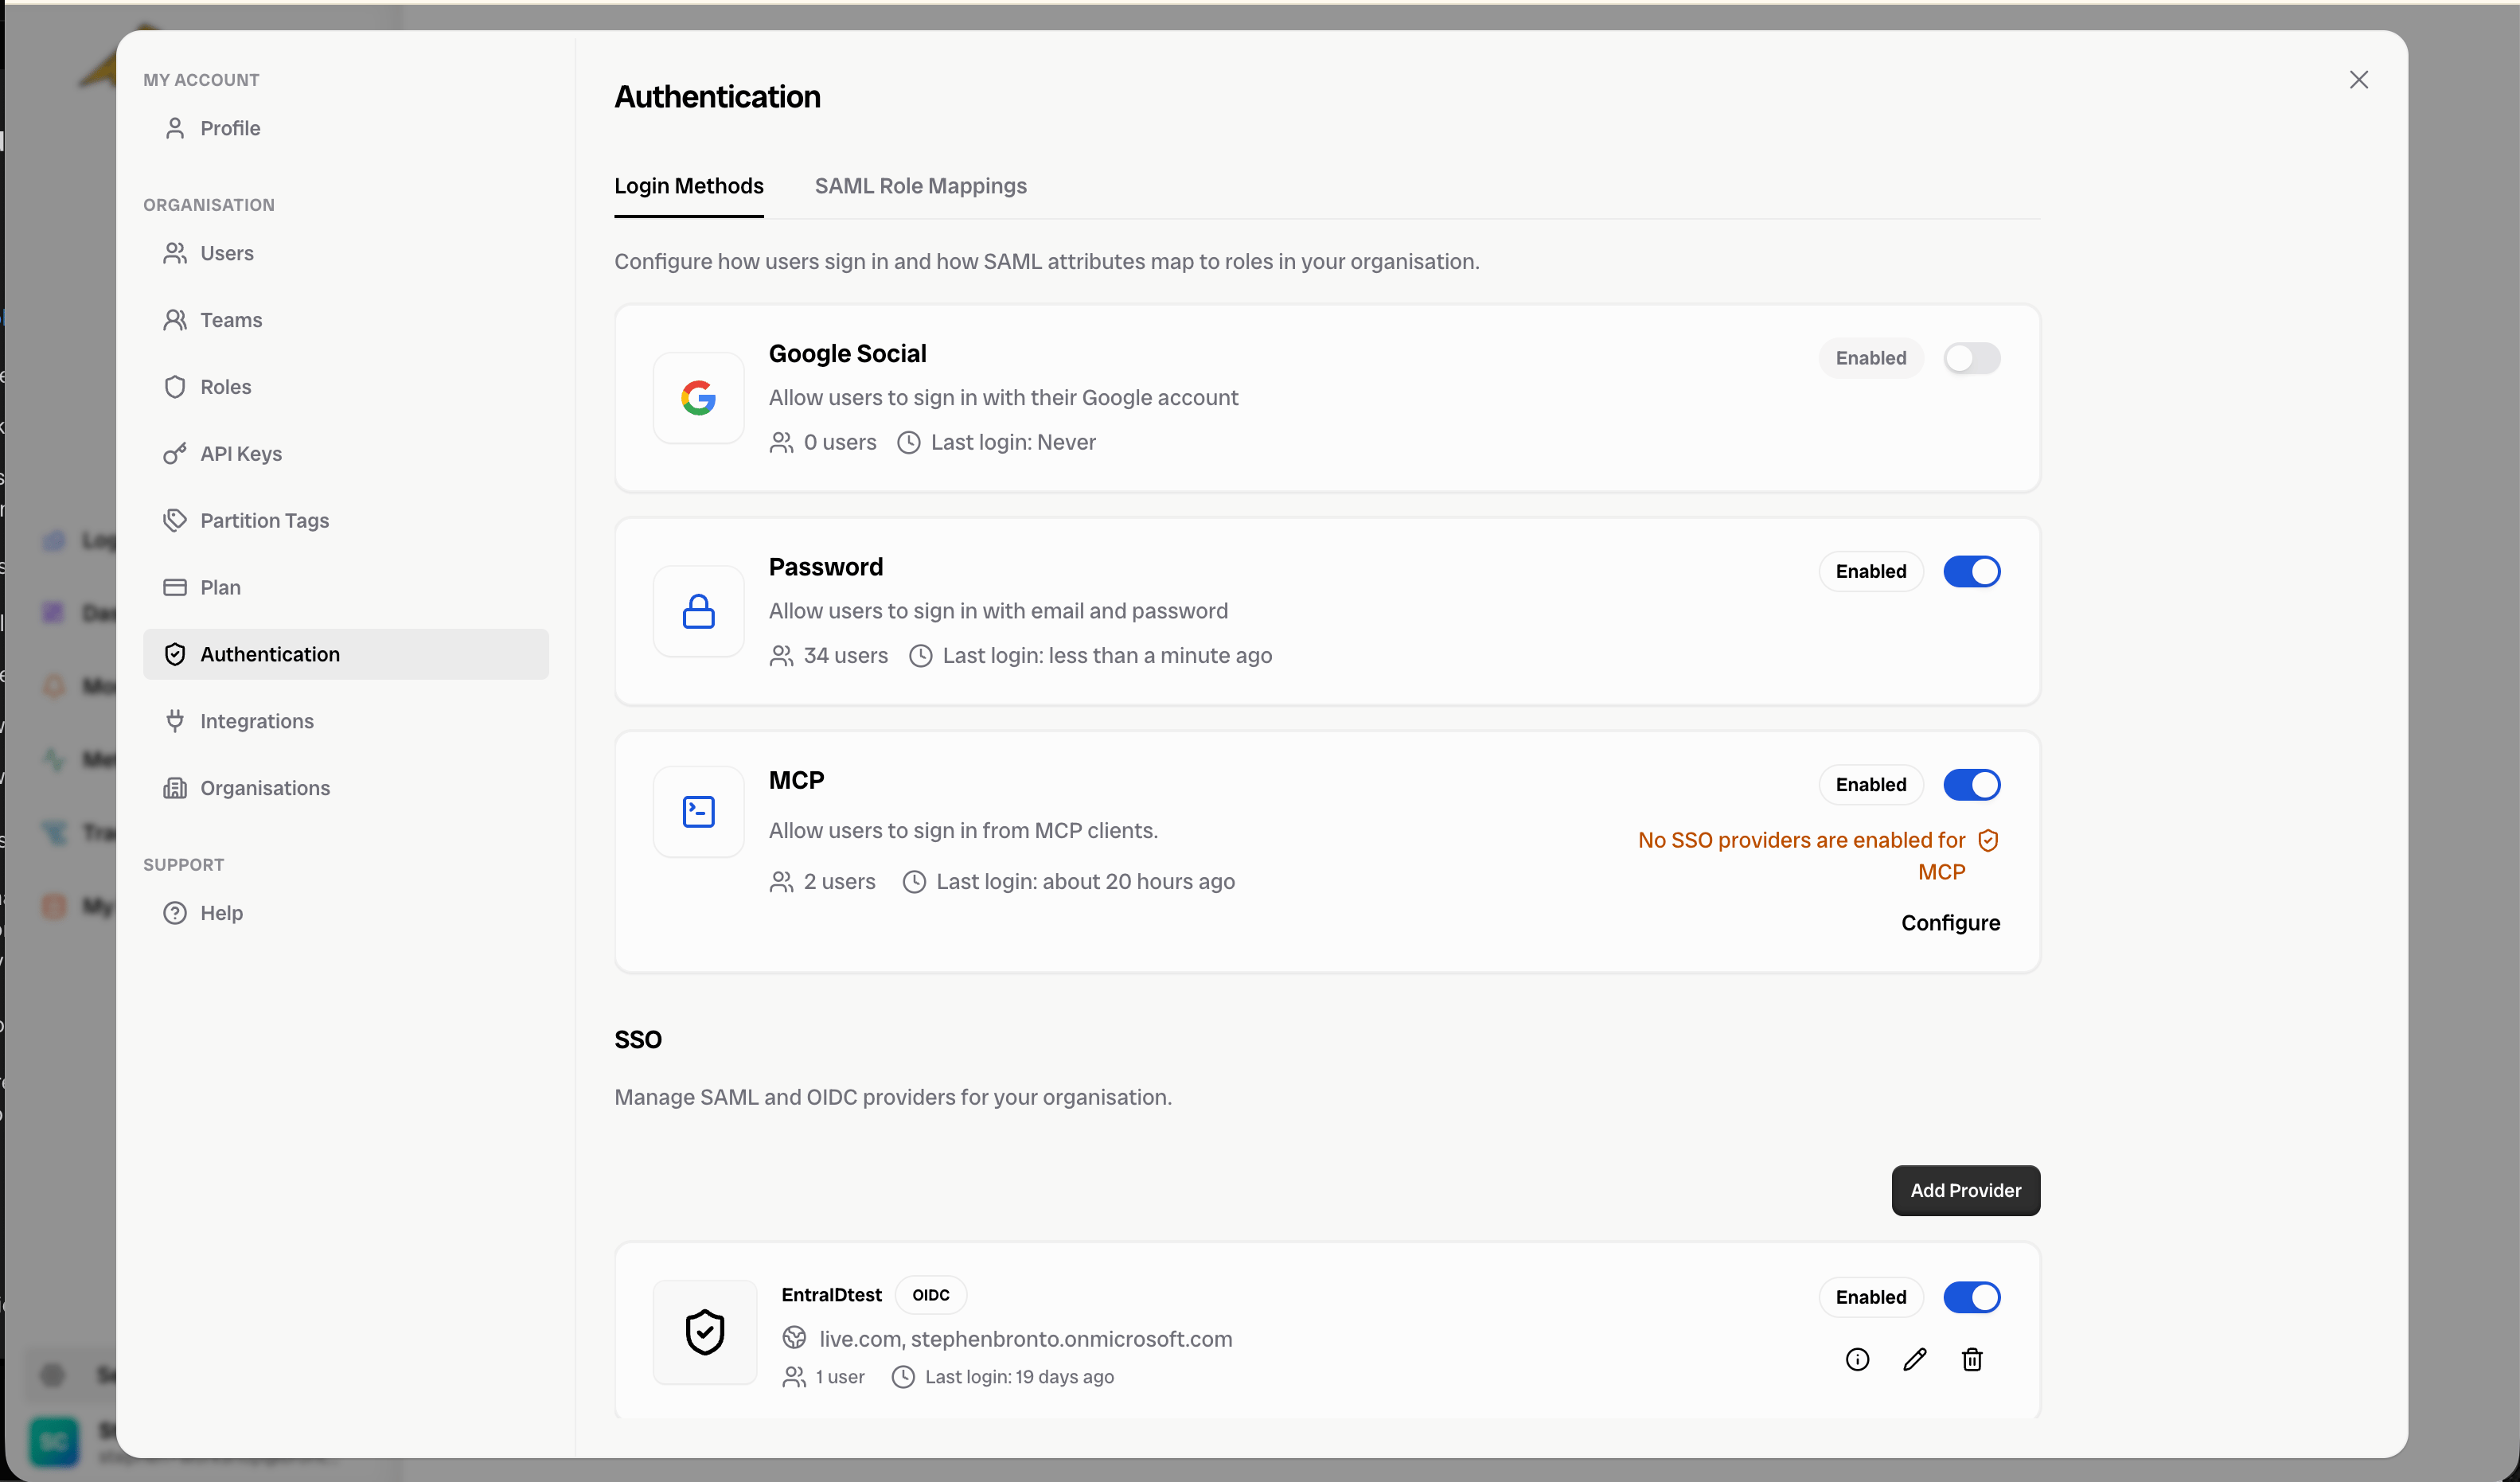
1. In Bronto, go to **Settings** > **Authentication** > **Login Methods**.
2. In the **SSO** section, click **Add Provider** to launch the setup wizard.
 At the top of the wizard, set **Choose protocol** to **SAML** or **OIDC**. The wizard then has four steps: **Name**, **Upload** (SAML) or **Provide** (OIDC), **Email**, and **Map**.
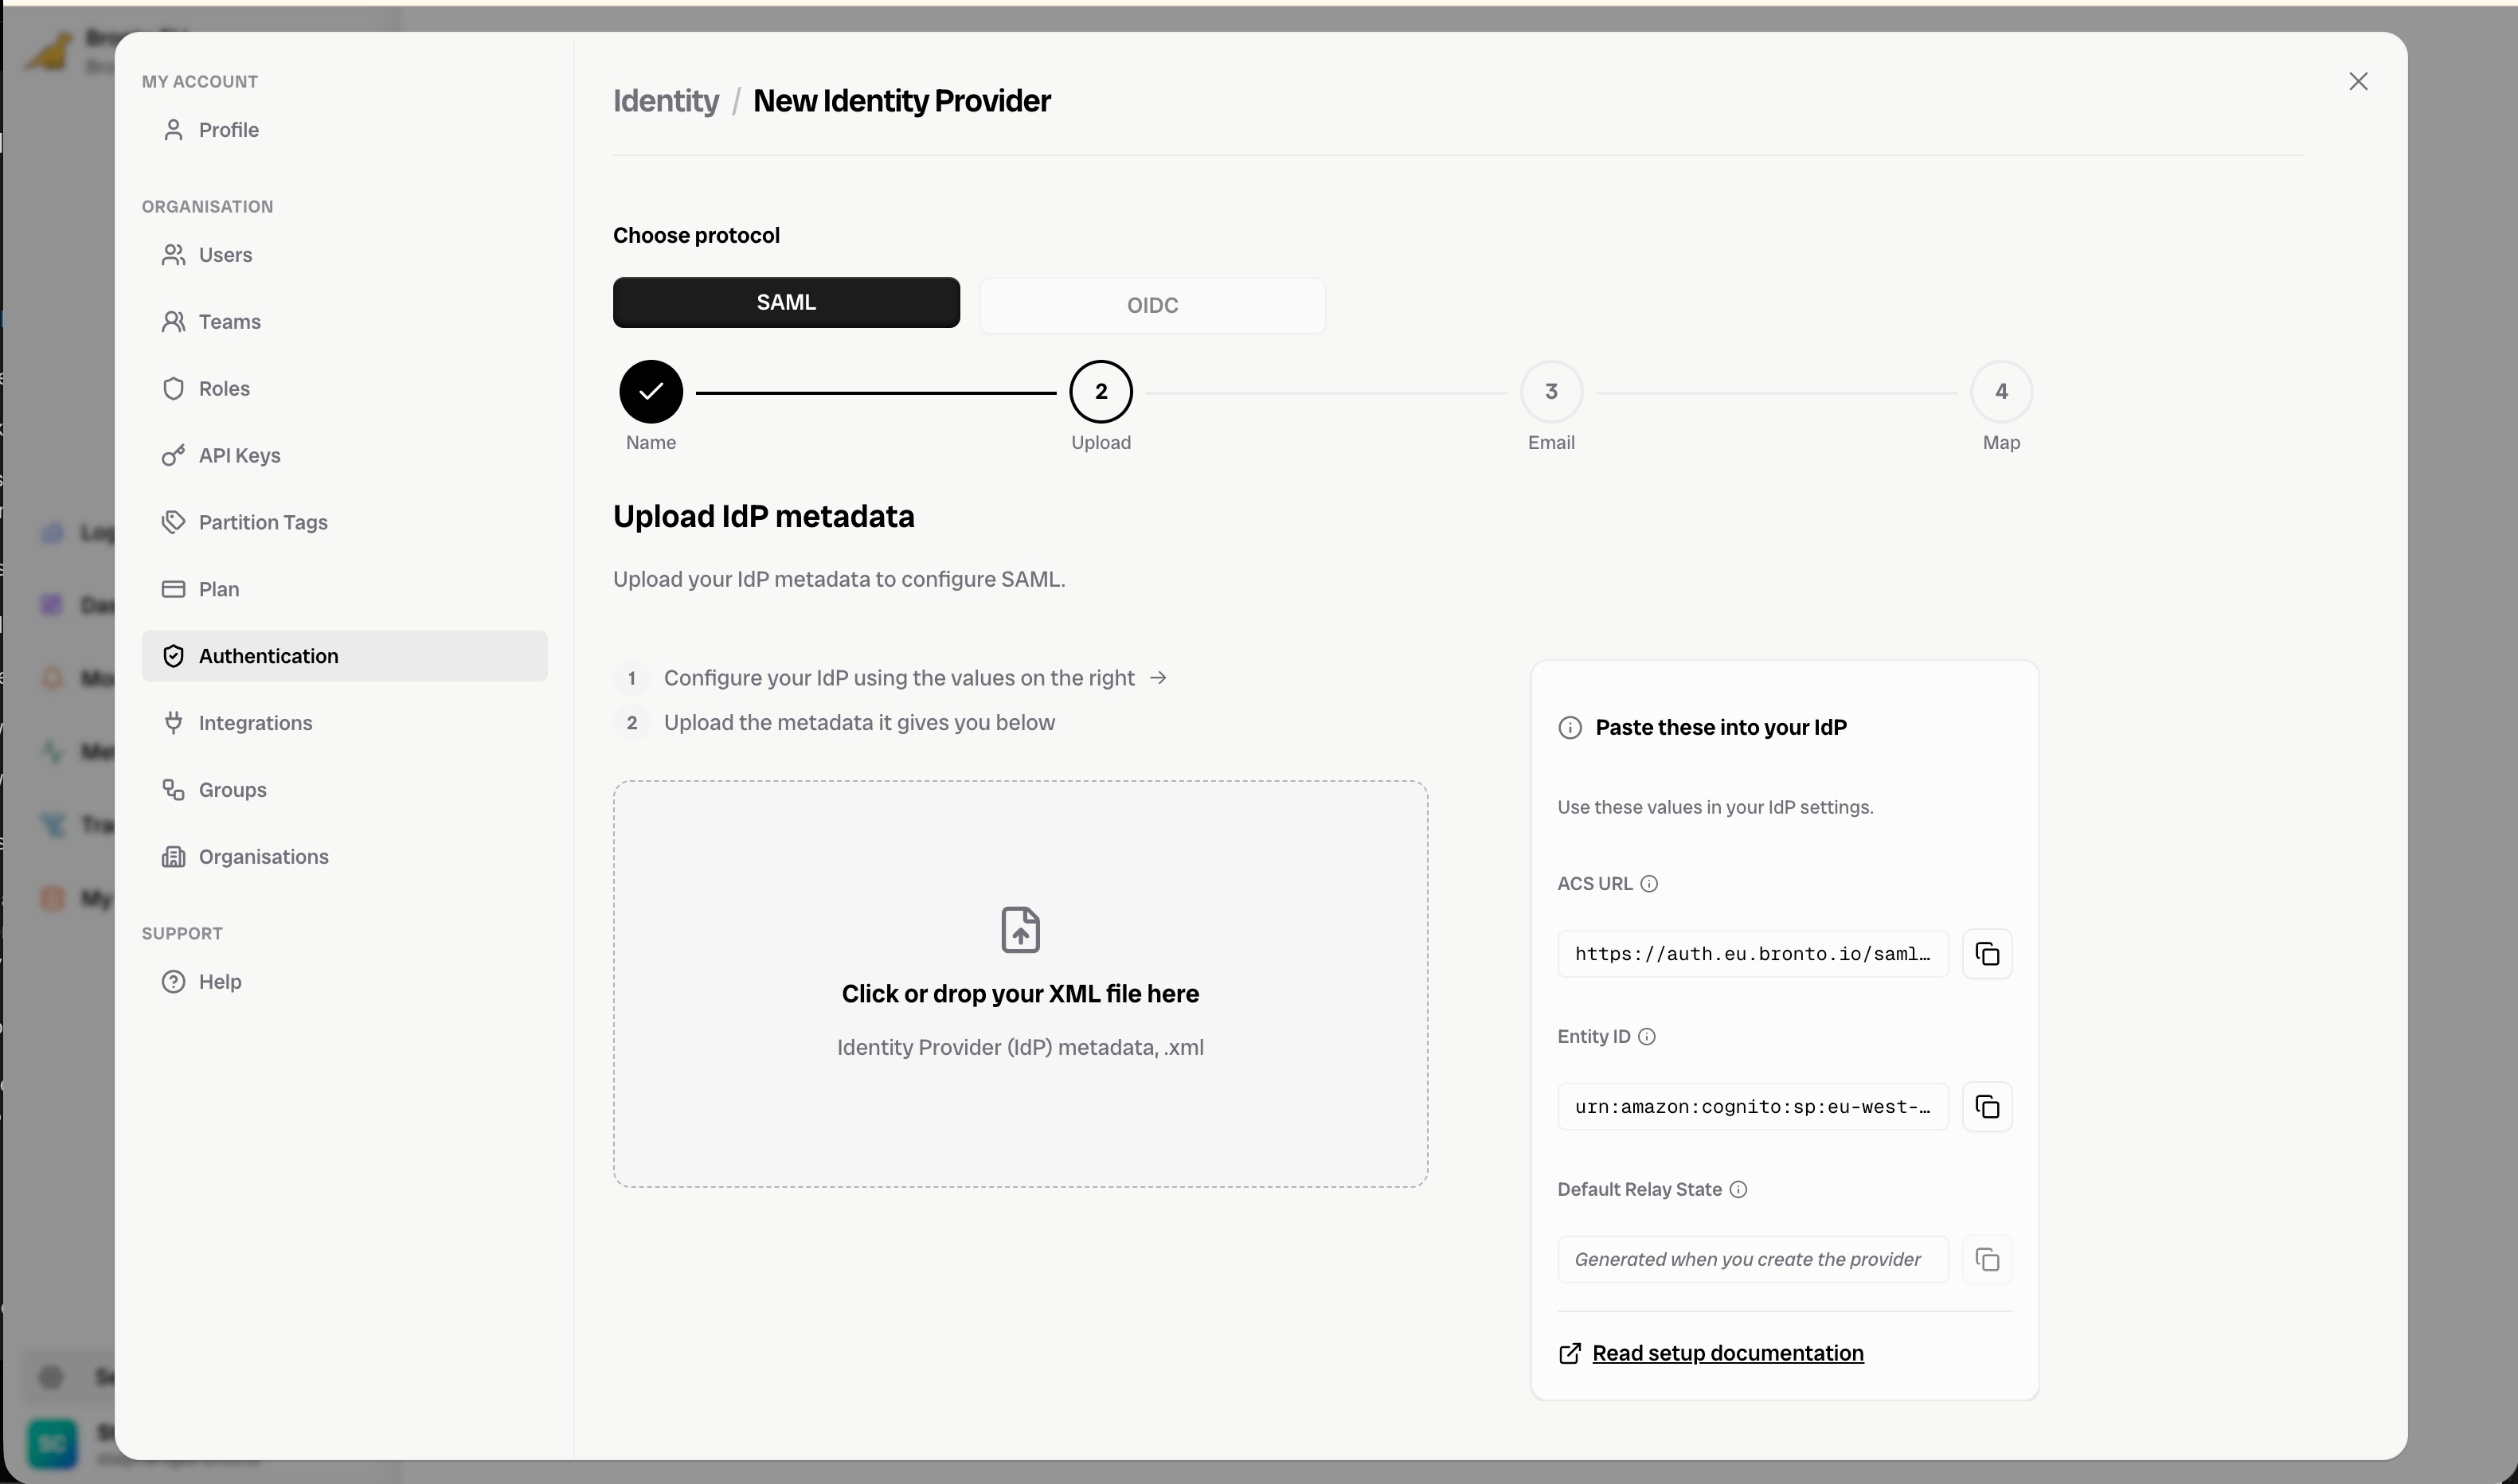 ### Name
Pick a unique name for this IdP within your organisation.
### Upload (SAML) / Provide (OIDC)
Provide the connection details for your chosen provider:
* **SAML** — Upload the IdP metadata XML from your provider.
* **OIDC** — Enter the **Client ID**, **Client Secret**, and **Issuer URL** from your provider.
The **Paste these into your IdP** panel shows the values you need to configure on the provider side — for SAML the **ACS URL**, **Entity ID**, and **Default Relay State**; for OIDC the **Redirect URI** and **Start URL**. See your IdP-specific documentation for where to enter them.
### Email
Choose the email domains associated with this IdP. They are used to recognise which IdP to use for a given account, and the field is prepopulated with your organisation's email domain. Type a domain and press **Enter** to add it.
Each domain may only be associated with a single IdP — ensure they do not repeat across providers.
### Map
Map your IdP's attributes to Bronto's. The attributes required by Bronto are **First Name**, **Last Name**, and **Email**. Input the matching provider attribute name, as configured in your IdP, in each row (e.g. `given_name` → First Name).
If you wish to use [role mapping](/Account-Management/SSO/SSO-Role-Mapping), also add a mapping to the **custom:member\_of** attribute — click **+ Add role mapping** if a row for it isn't already shown.
Click **Save** to create and enable the IdP.
## Manage providers
Your new IdP is enabled automatically and appears in the **SSO** list on the **Login Methods** page, where you can enable or disable it, view its details, edit it, or delete it. You control which login methods are enabled from the same page — you must always have at least one login method enabled.
To view a provider's connection details again (ACS URL, Entity ID, Start URL, etc.), open the provider from the **SSO** list.
## Next steps
If you wish to use role mapping, configure it on the **SAML Role Mappings** tab. See [SSO Role Mapping](/Account-Management/SSO/SSO-Role-Mapping) for more information.
### Name
Pick a unique name for this IdP within your organisation.
### Upload (SAML) / Provide (OIDC)
Provide the connection details for your chosen provider:
* **SAML** — Upload the IdP metadata XML from your provider.
* **OIDC** — Enter the **Client ID**, **Client Secret**, and **Issuer URL** from your provider.
The **Paste these into your IdP** panel shows the values you need to configure on the provider side — for SAML the **ACS URL**, **Entity ID**, and **Default Relay State**; for OIDC the **Redirect URI** and **Start URL**. See your IdP-specific documentation for where to enter them.
### Email
Choose the email domains associated with this IdP. They are used to recognise which IdP to use for a given account, and the field is prepopulated with your organisation's email domain. Type a domain and press **Enter** to add it.
Each domain may only be associated with a single IdP — ensure they do not repeat across providers.
### Map
Map your IdP's attributes to Bronto's. The attributes required by Bronto are **First Name**, **Last Name**, and **Email**. Input the matching provider attribute name, as configured in your IdP, in each row (e.g. `given_name` → First Name).
If you wish to use [role mapping](/Account-Management/SSO/SSO-Role-Mapping), also add a mapping to the **custom:member\_of** attribute — click **+ Add role mapping** if a row for it isn't already shown.
Click **Save** to create and enable the IdP.
## Manage providers
Your new IdP is enabled automatically and appears in the **SSO** list on the **Login Methods** page, where you can enable or disable it, view its details, edit it, or delete it. You control which login methods are enabled from the same page — you must always have at least one login method enabled.
To view a provider's connection details again (ACS URL, Entity ID, Start URL, etc.), open the provider from the **SSO** list.
## Next steps
If you wish to use role mapping, configure it on the **SAML Role Mappings** tab. See [SSO Role Mapping](/Account-Management/SSO/SSO-Role-Mapping) for more information.