> ## Documentation Index
> Fetch the complete documentation index at: https://docs.bronto.io/llms.txt
> Use this file to discover all available pages before exploring further.
# Multi-Organisation
> Operate multiple independent organisations within a single Bronto account, with centralised governance, role-based access, and isolated data.
This guide covers:
* What multi-organisation support does (and does not do)
* How to enable it
* How access works with users and groups
## 1. What Multi-Organisation Support Does
When enabled, multi-organisation support allows you to:
* Create separate organisations under a single parent (management) organisation
* Assign users or groups to each organisation with specific roles
* Cleanly isolate data, dashboards, monitors, and integrations between organisations
* Switch between organisations using a selector in the interface
Each organisation functions as an independent workspace, while the management organisation retains control over access and configuration.
## 2. What Multi-Organisation Support Does Not Do
To avoid confusion, multi-organisation support has the following limitations:
* You **cannot query multiple organisations at the same time**
* All searches, dashboards, monitors, and API requests operate only on the **currently selected organisation**
* There is **no cross-organisation aggregation**, federated querying, or unified analytics view
* Switching organisations fully changes context, including:
* Data
* Dashboards
* Monitors
* Integrations
* Usage
## 3. Enabling Multi-Organisation Mode
To enable multi-organisation support:
1. Go to **Settings → Organisations**
2. Open the **General** tab
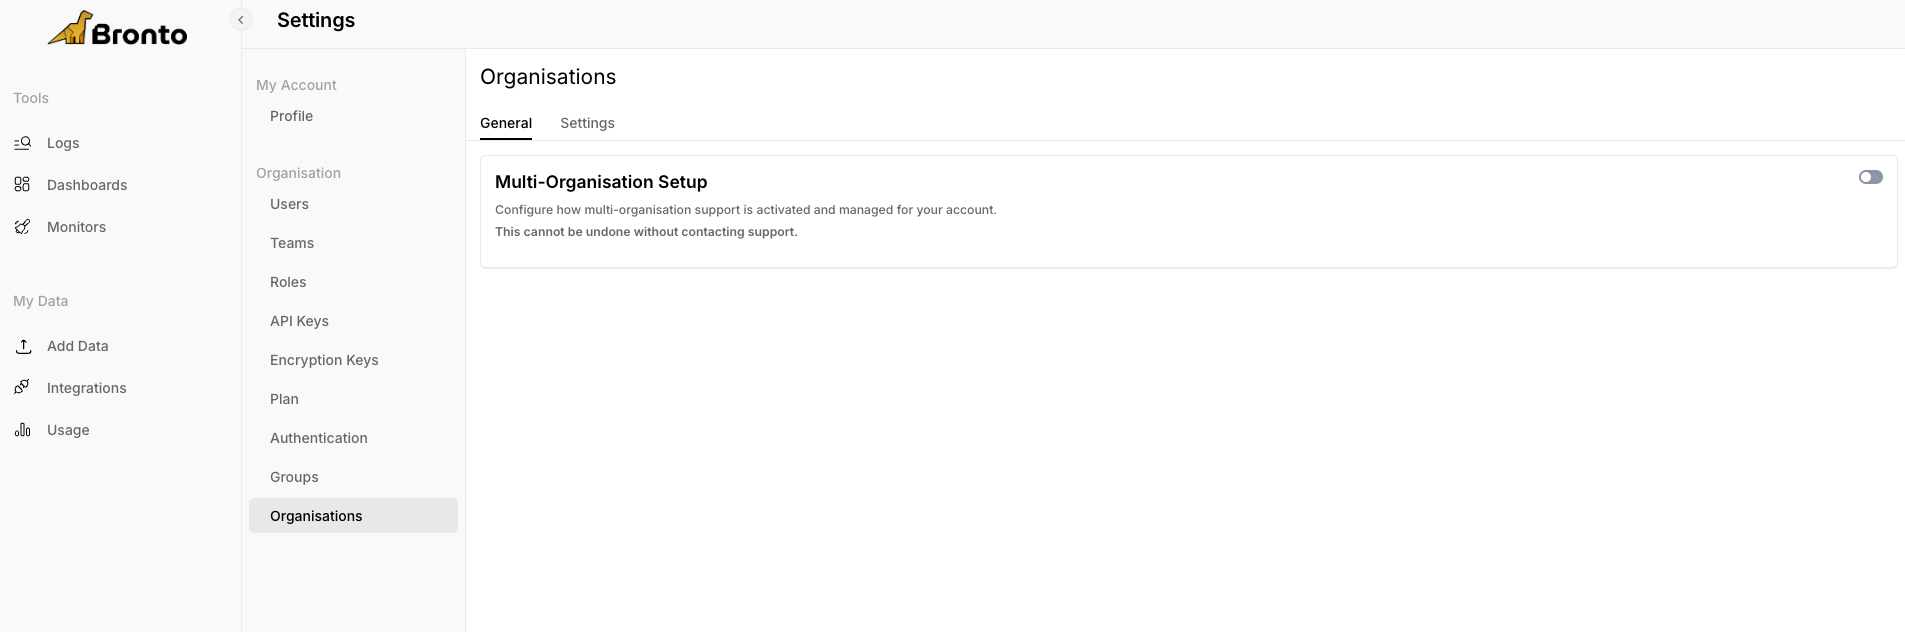 3. Toggle **Multi-Organisation Setup** to enable it
You will then see two additional options:
3. Toggle **Multi-Organisation Setup** to enable it
You will then see two additional options:
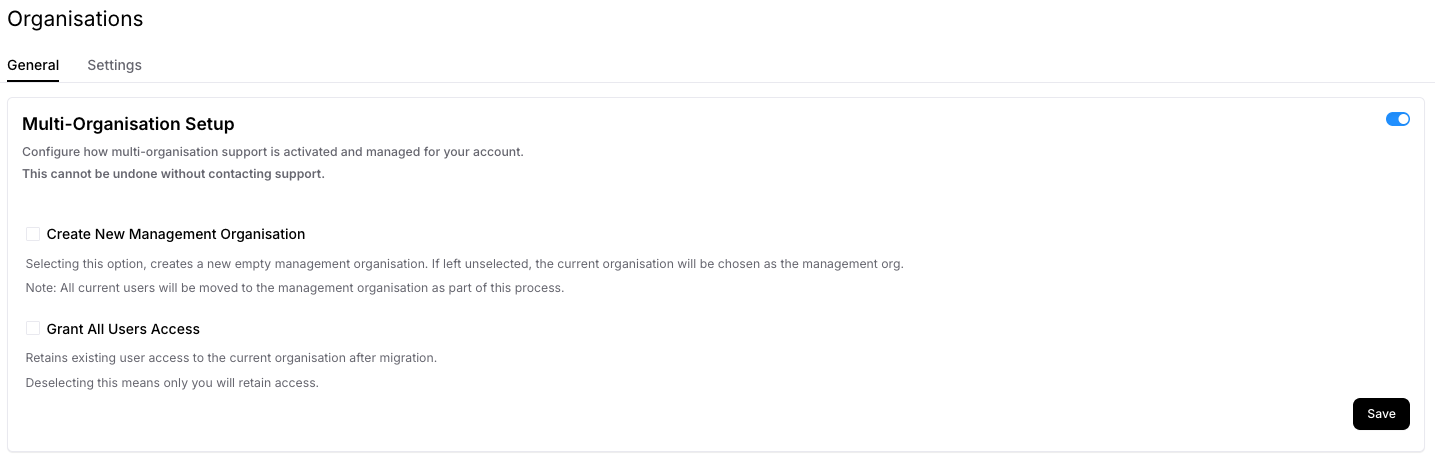 ### Create New Management Organisation
* Creates a new, empty parent (management) organisation
* If **disabled**, your current organisation becomes the management organisation
* If **enabled**, you will be prompted to provide a name for the new management organisation
### Create New Management Organisation
* Creates a new, empty parent (management) organisation
* If **disabled**, your current organisation becomes the management organisation
* If **enabled**, you will be prompted to provide a name for the new management organisation
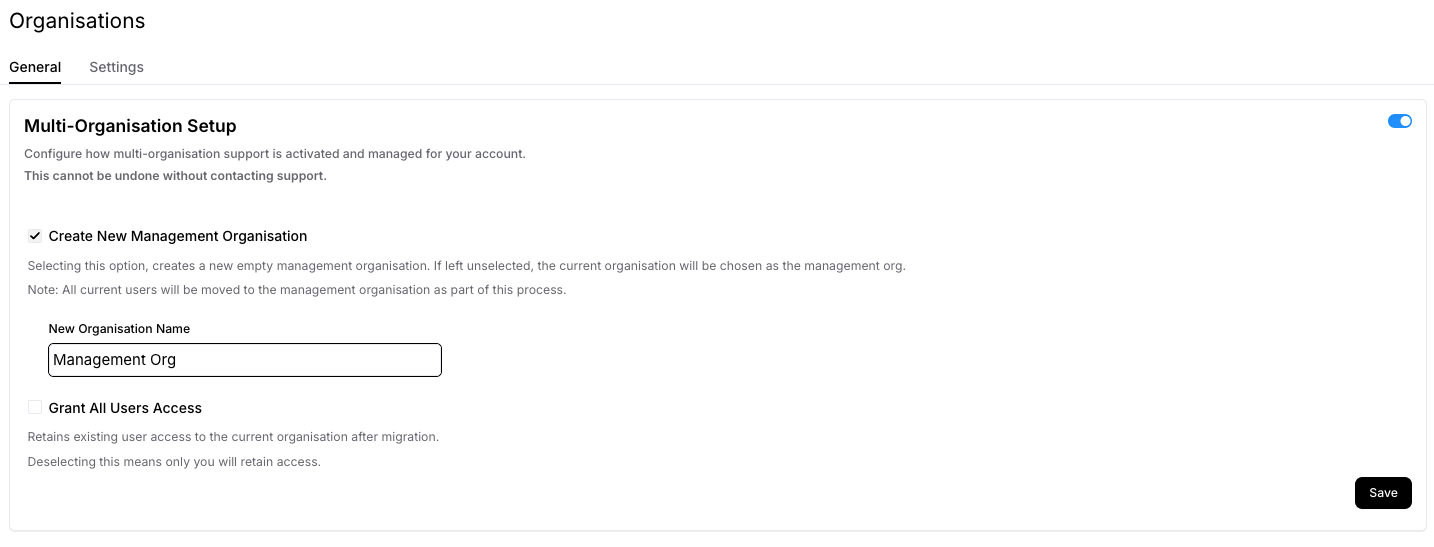 ### Grant All Users Access
* Retains access for all existing users after migration
* If disabled, only you (the administrator) retain access initially
* This operation **cannot be undone** without contacting support
> **Note:**\
> The administrator who enables multi-organisation support is automatically added as an **Admin** to:
>
> * The management organisation
> * Any newly created child organisations
### Sign-in Required
After enabling multi-organisation support, **log out and back in** to refresh your session.
## 4. The Organisation Switcher
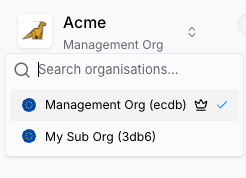
After signing back in, an organisation selector appears in the **top-left of the navigation menu**.
This dropdown shows every organisation you have access to. Selecting an organisation switches your entire Bronto workspace to that context.
### Grant All Users Access
* Retains access for all existing users after migration
* If disabled, only you (the administrator) retain access initially
* This operation **cannot be undone** without contacting support
> **Note:**\
> The administrator who enables multi-organisation support is automatically added as an **Admin** to:
>
> * The management organisation
> * Any newly created child organisations
### Sign-in Required
After enabling multi-organisation support, **log out and back in** to refresh your session.
## 4. The Organisation Switcher
After signing back in, an organisation selector appears in the **top-left of the navigation menu**.
This dropdown shows every organisation you have access to. Selecting an organisation switches your entire Bronto workspace to that context.
 > **Note:**\
> The management organisation is denoted by a **crown icon**.
## 5. Groups: Managing Access at Scale
Groups simplify managing access across multiple organisations.
A **group** is a platform-level collection of users that can be granted roles on one or more organisations.
### Creating a Group
1. Go to **Settings → Groups**
2. Click **Create Group** and provide a name
3. Open the group and add users using the **Edit** button
Groups are:
* Global across the platform
* Visible and manageable **only from the management organisation**
## 6. Assigning Users and Groups to Organisations
To manage organisation access:
1. Go to **Settings → Organisations**
2. Select an organisation
3. Click **Edit Organisation**
You can then:
* Add users directly
* Add groups
* Assign roles to each (e.g. **Viewer**, **Editor**, **Admin**)
### Group Access Behaviour
When adding a group:
* All users in the group automatically gain access
* Permissions are determined by the role assigned to the group
* Access persists until:
* The user is removed from the group, or
* The group’s organisation assignment is changed
> **Roles are additive**\
> A user’s effective permissions are the combined permissions from all roles they hold across direct and group assignments.
## 7. Notes and Behaviour
* **Groups** and **Organisations** settings are only available in the **management organisation**
* Users can belong to multiple organisations with different roles in each
* Removing a user from a group immediately removes their inherited organisation access
* Child organisations **cannot** create or modify groups
> **Note:**\
> The management organisation is denoted by a **crown icon**.
## 5. Groups: Managing Access at Scale
Groups simplify managing access across multiple organisations.
A **group** is a platform-level collection of users that can be granted roles on one or more organisations.
### Creating a Group
1. Go to **Settings → Groups**
2. Click **Create Group** and provide a name
3. Open the group and add users using the **Edit** button
Groups are:
* Global across the platform
* Visible and manageable **only from the management organisation**
## 6. Assigning Users and Groups to Organisations
To manage organisation access:
1. Go to **Settings → Organisations**
2. Select an organisation
3. Click **Edit Organisation**
You can then:
* Add users directly
* Add groups
* Assign roles to each (e.g. **Viewer**, **Editor**, **Admin**)
### Group Access Behaviour
When adding a group:
* All users in the group automatically gain access
* Permissions are determined by the role assigned to the group
* Access persists until:
* The user is removed from the group, or
* The group’s organisation assignment is changed
> **Roles are additive**\
> A user’s effective permissions are the combined permissions from all roles they hold across direct and group assignments.
## 7. Notes and Behaviour
* **Groups** and **Organisations** settings are only available in the **management organisation**
* Users can belong to multiple organisations with different roles in each
* Removing a user from a group immediately removes their inherited organisation access
* Child organisations **cannot** create or modify groups